The process begins with selecting the right vehicle. Each of our vehicles undergoes a thorough, frame-off restoration where no detail is overlooked. Only high-quality parts, components, and materials are used to ensure top-notch results.
We remain true to the vehicle’s classic style and originality while seamlessly integrating modern touches that enhance reliability and comfort. From start to finish, every element receives meticulous attention.
Our dedication to detail is evident throughout the entire build. Every individual part is disassembled, prepared, and painted separately. We don’t cut corners by taping parts for paint—we believe in doing things the right way.
The frame-off restoration follows a detailed, step-by-step process, ensuring precision and quality at every stage. Below, you’ll find an outline of each step in our restoration process:
1. sourcing
We take great care in selecting each vehicle, with a focus on its condition. Our search prioritizes unmodified vehicles with a structurally sound chassis, free from rust or significant frame damage. Only after a thorough inspection—including verifying that engine numbers and other key mechanical components match the original factory records— we proceed with the purchase. Once this extensive process is complete, the vehicle becomes part of our carefully curated inventory.


2. disassembling
The entire vehicle is meticulously disassembled down to the bare frame for a comprehensive inspection and thorough preparation for the rebuild. The frame is completely stripped to ensure a solid foundation for the restoration process.
During this step, all parts are carefully cataloged to facilitate detailed inspection and streamline the future reassembly. This ensures that every component is accounted for and ready for proper installation during the rebuilding phase.


3. inspection
At this stage, the bare frame undergoes a thorough inspection on a specialized jig to verify factory alignment. This detailed examination of the stripped frame is essential to ensuring a solid foundation for the rebuild.
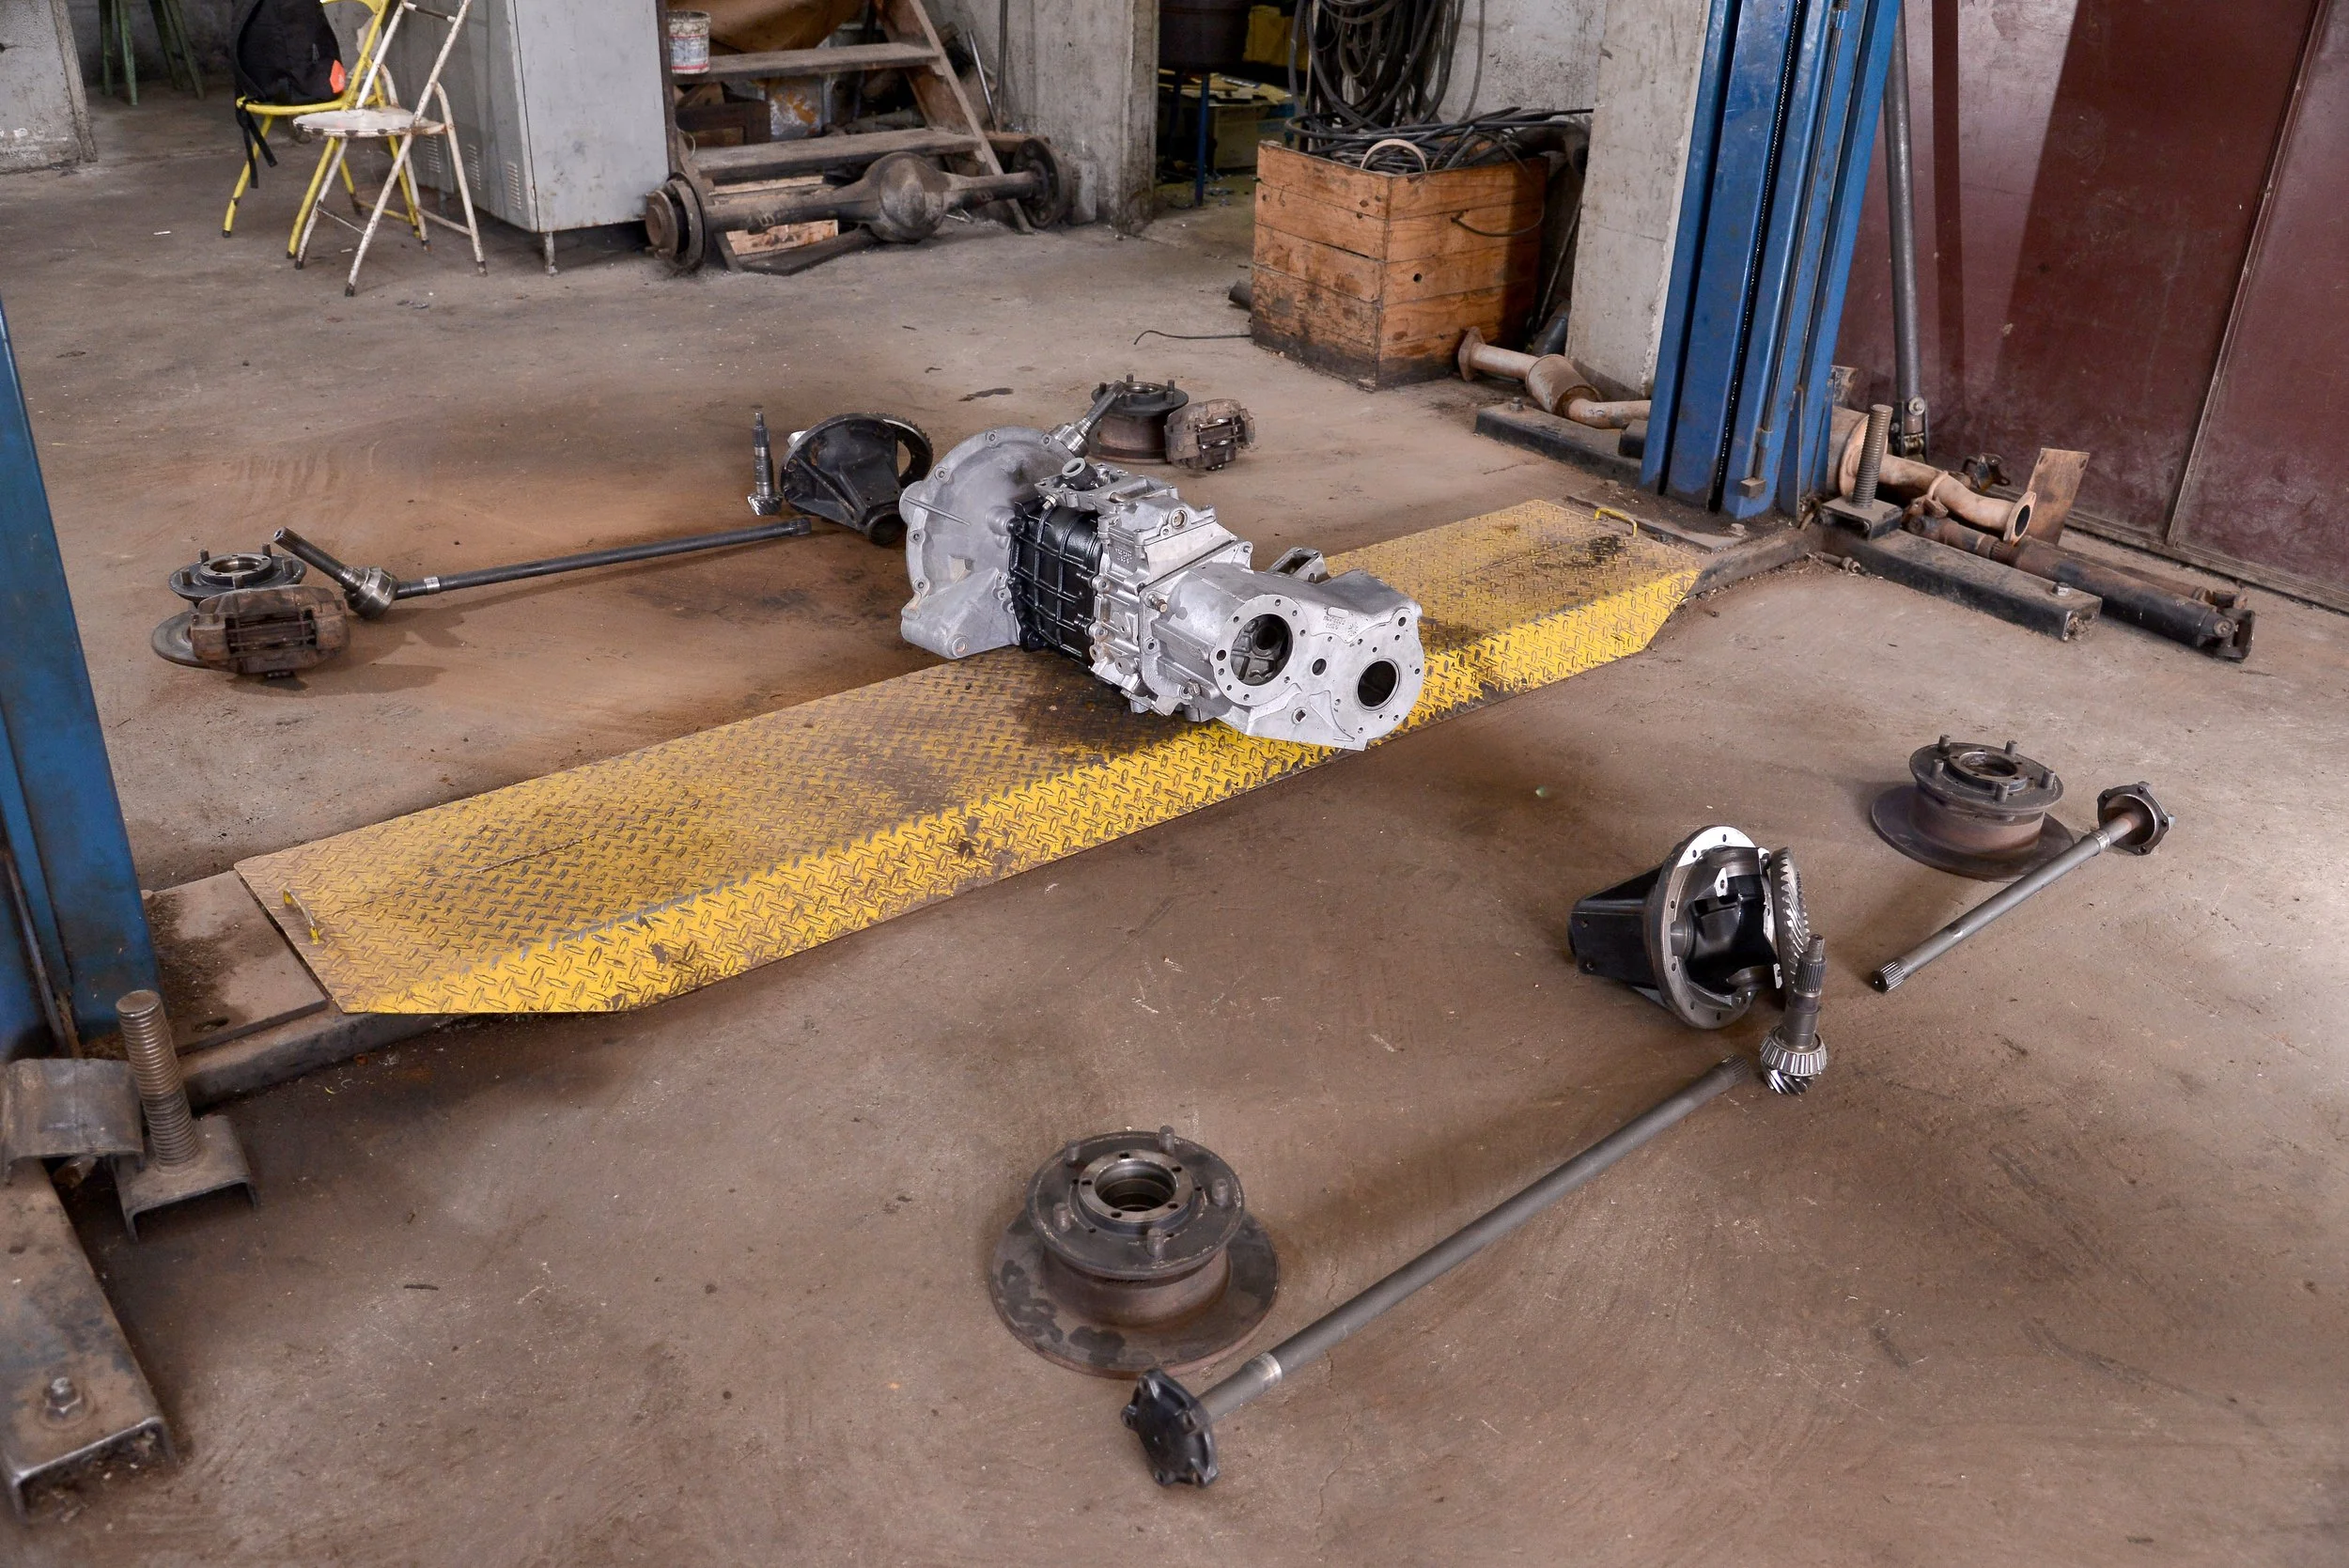
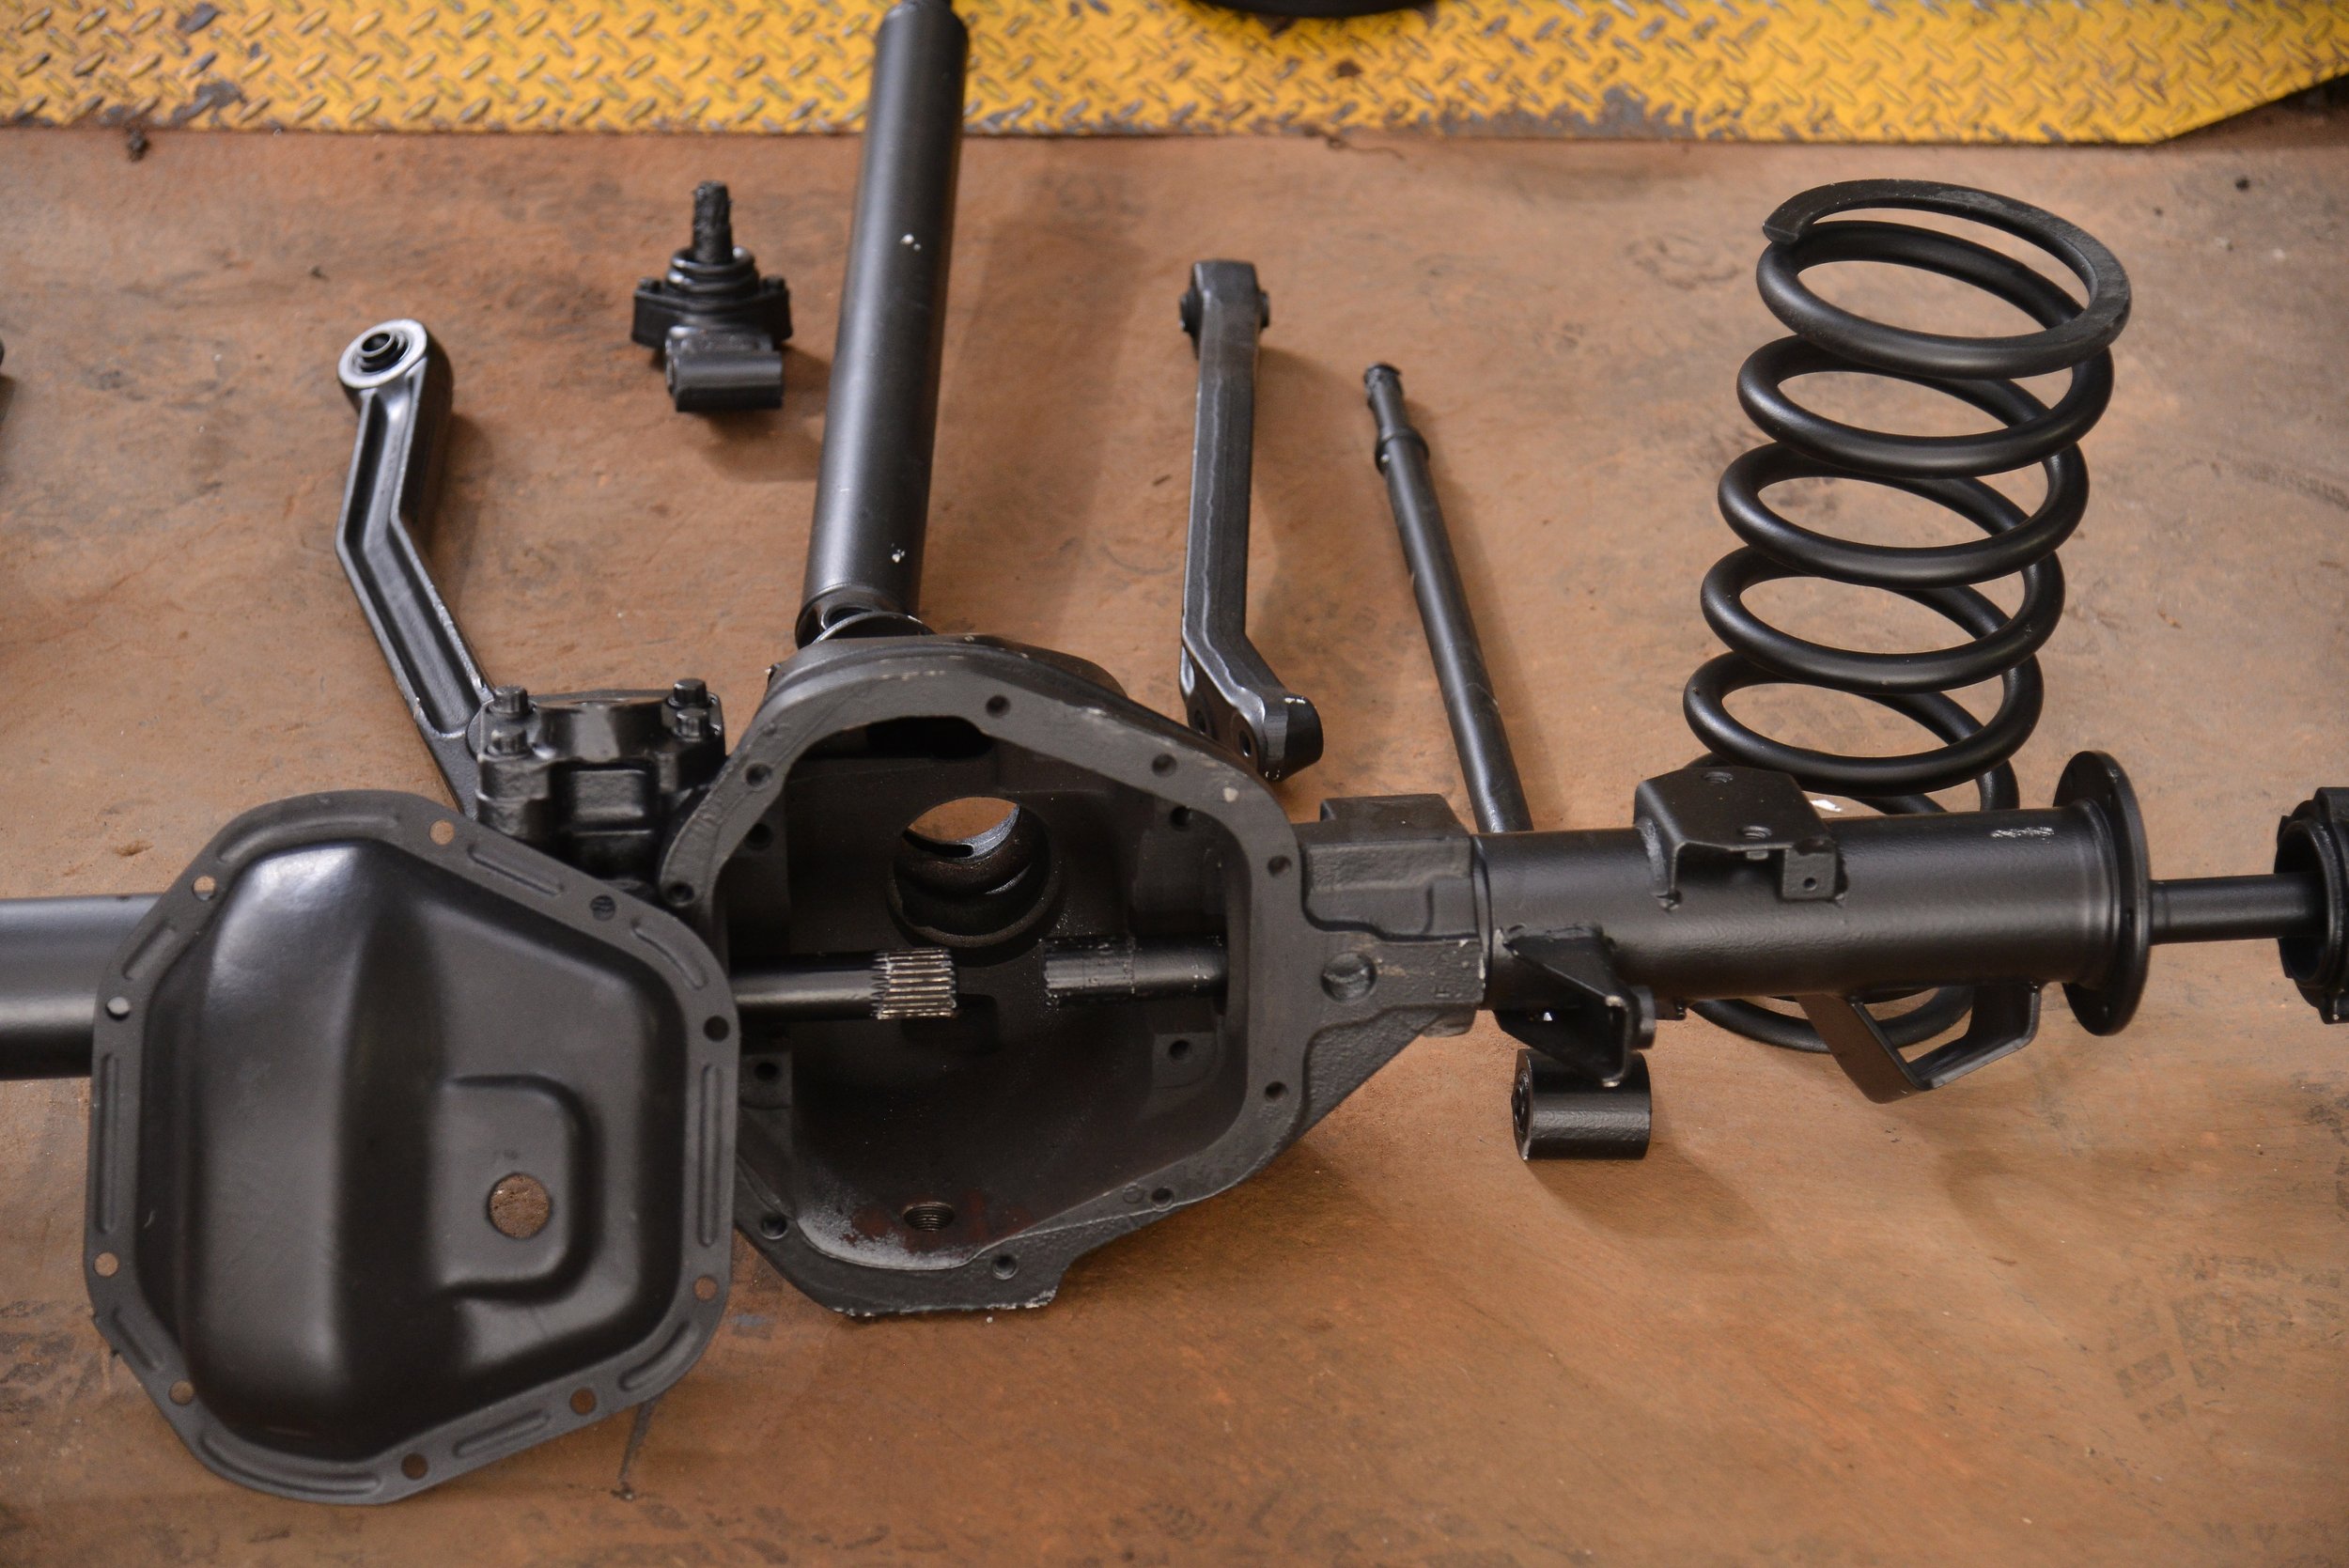
Simultaneously, critical components such as the axles, gearboxes, transfer cases, and engine are disassembled for careful inspection and any necessary repairs or replacements.
During this phase, key body parts—including the bulkhead, doors, and other essential components—are sourced as needed to ensure the rebuild meets the highest standards. Only high-quality parts are used throughout the process to guarantee lasting performance and reliability.


4. sand blasting and preparation
Once the frame passes the factory alignment inspection, it undergoes a thorough cleaning process to remove any dirt and debris from the inside of the box-type sections. The frame is then sandblasted and primed for added protection.
In addition, components such as axle housings, driveshafts, suspension parts, and various other elements are also sandblasted and primed. During this stage, select parts are set aside for zinc plating or hot-dip galvanizing, including elements like the front inner wheel arches to maintain an original factory appearance.


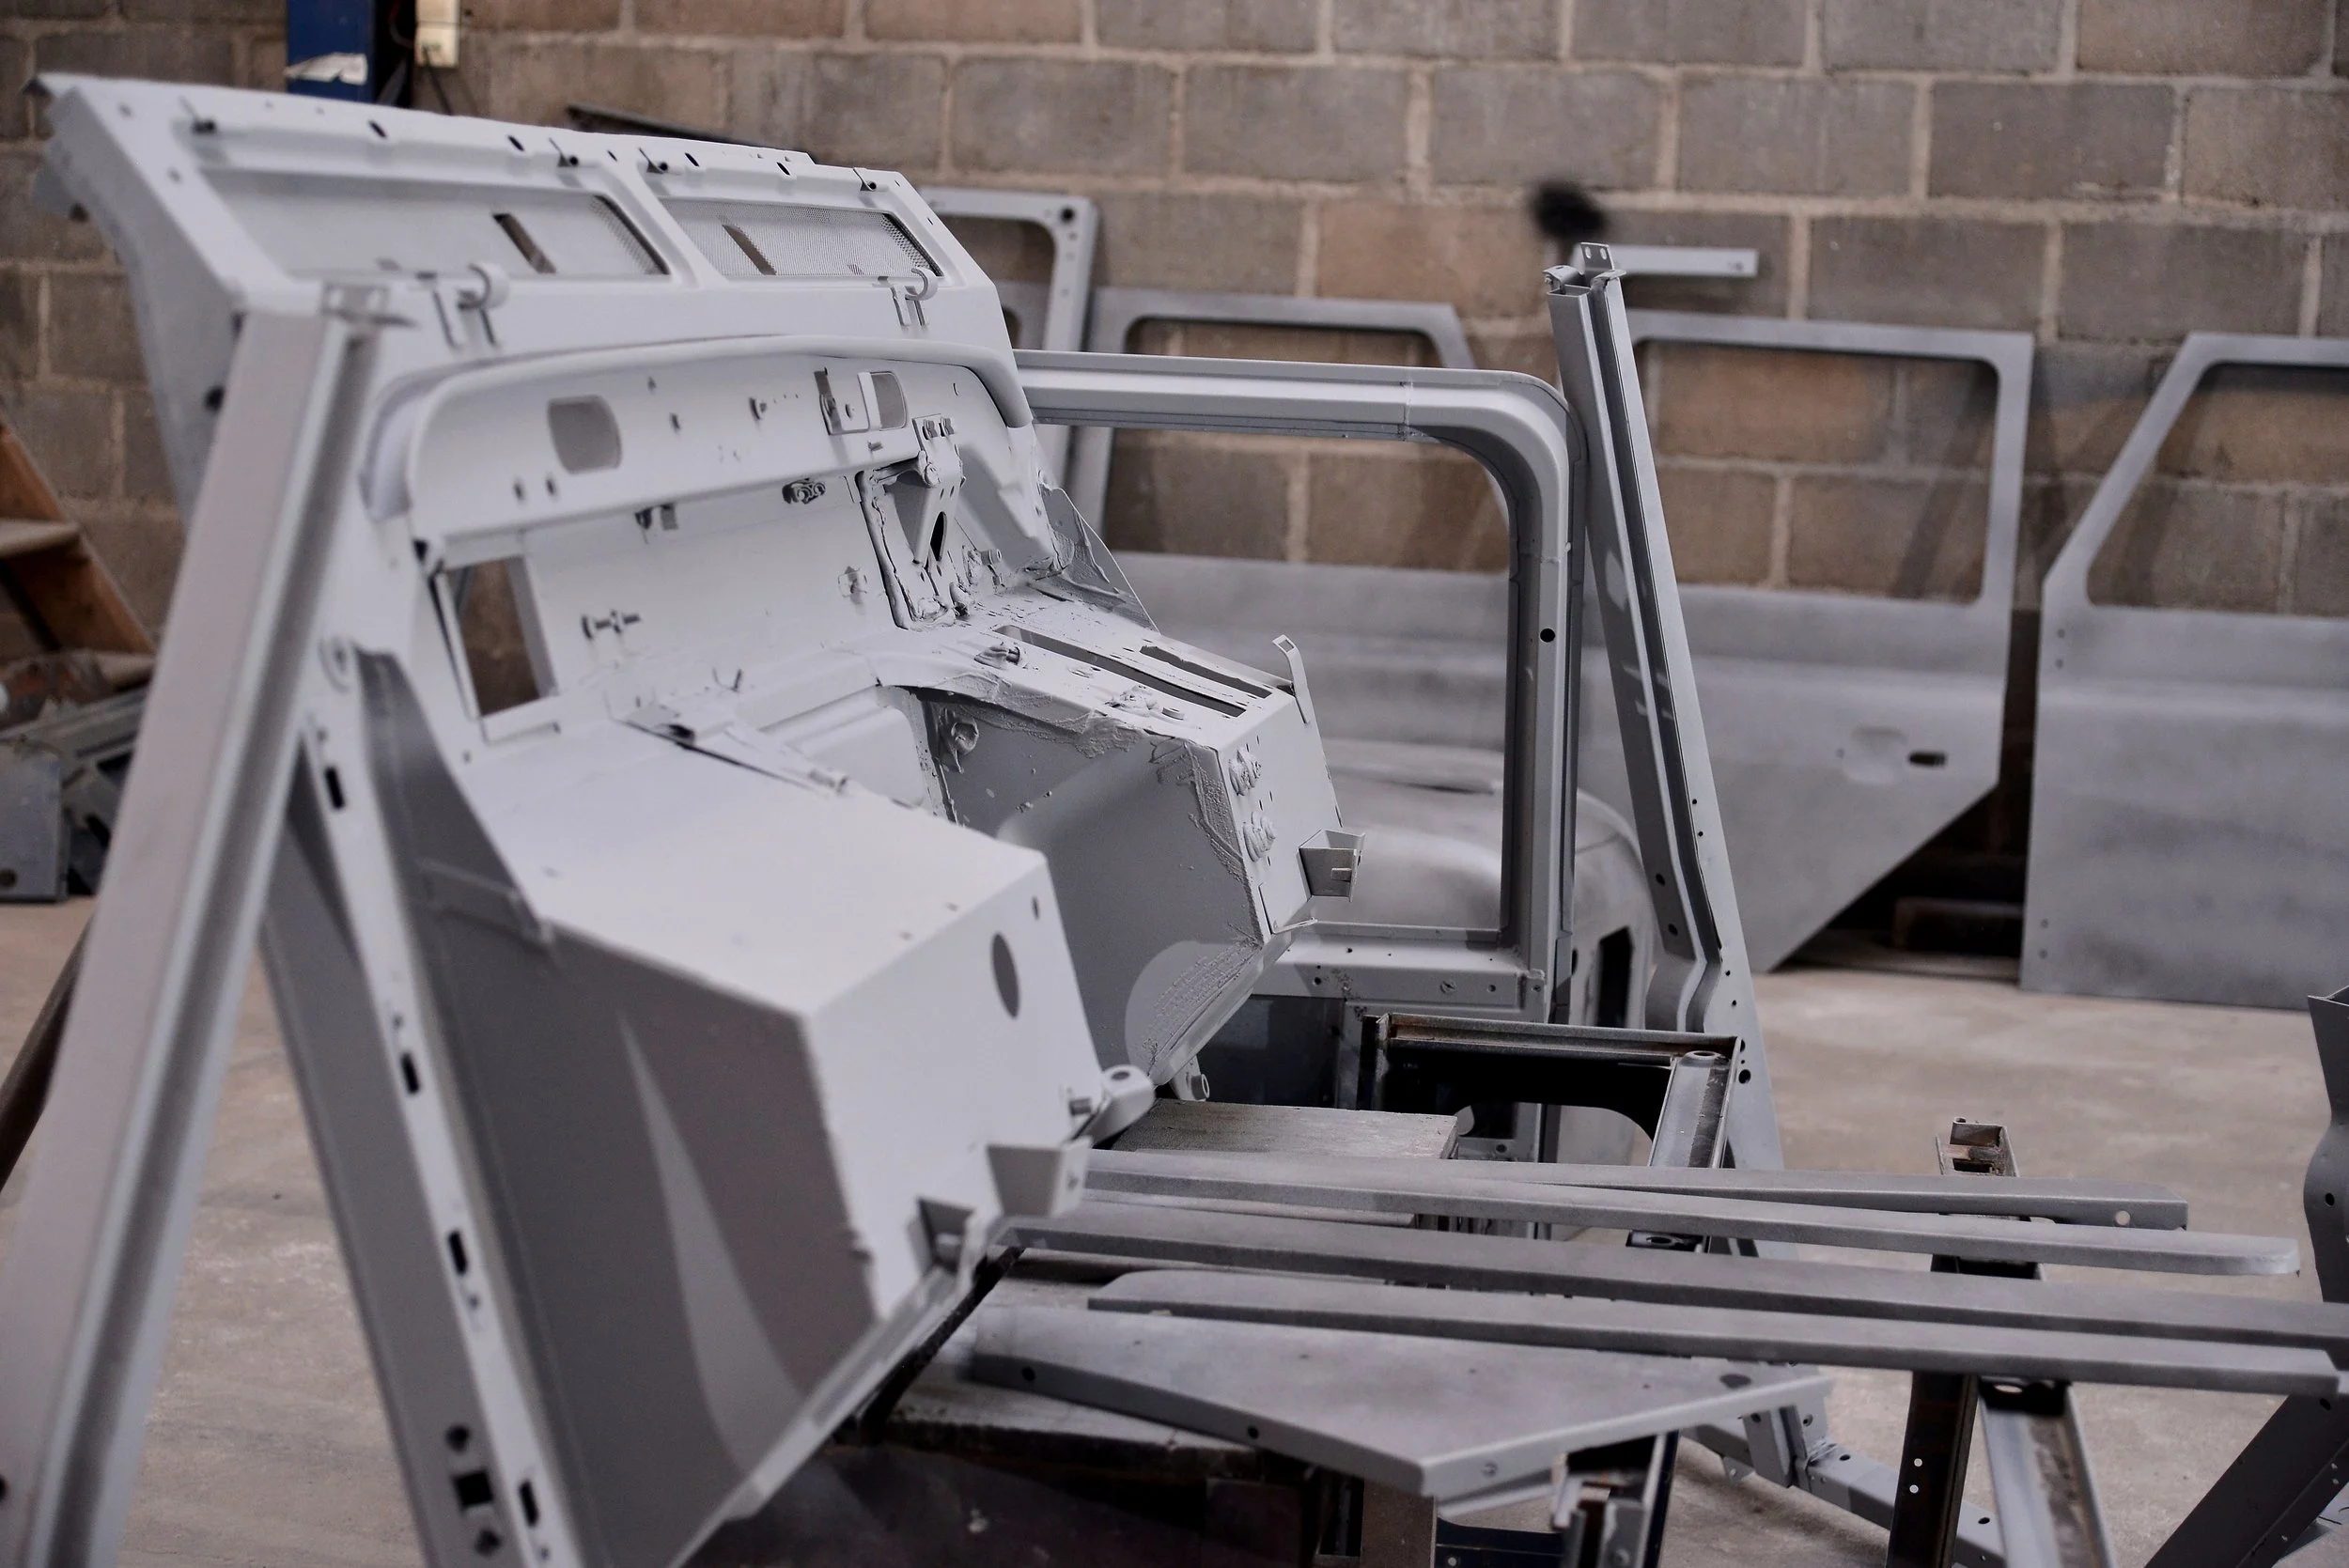
5. striping the paint
Stripping all paint and any additional materials down to the bare metal is a critical step in ensuring the highest quality restoration. This process allows us to thoroughly inspect the entire body, revealing any previous repairs or hidden damage that may have been covered up. Since many of these vehicles are over 25 years old, it’s common for them to have undergone various repairs over the years—some of which may not have been done correctly.
By removing everything down to the metal, we can assess the condition of the body with precision, addressing any underlying issues before moving forward. This ensures that the body is properly prepped and that future work, including painting, adheres to the highest standards of quality. Proper preparation of the body is essential to achieving a flawless, long-lasting finish, making this an extremely important step in the restoration process.
At this point some parts are replaced with new ones as needed, such as doors, bulkheads, and others.


6. body alignment
For some, this process might seem like an unnecessary step, but for us, it’s absolutely crucial. Before painting, we essentially reassemble the entire vehicle with all the prepped parts to ensure perfect alignment. This allows us to identify and correct any misalignment issues with body panels, doors, roof, and side panels early in the process.
Once we’re confident that every component is perfectly aligned, the vehicle is disassembled again for the final stages of preparation and painting. This step is especially important for Land Rover Defenders, which are notorious for alignment issues— even when they leave the factory brand new.
Aligning all body parts is an essential part of our restoration process, and one that is often overlooked by others in this area. Ensuring precision here allows us to deliver the finest quality finish possible.


7. body work
The body is meticulously prepared and primed, using only high-quality materials. This is one of the most time-consuming steps, as it takes considerable effort to ensure that all panels are completely flat and flawless before applying the primer. We use the minimal amount of filler necessary to correct imperfections, as we believe the metal—whether steel or aluminum—should be perfectly smooth prior to paint preparation.
This thorough process directly impacts the quality of the final finish. Even new parts undergo the same meticulous preparation as used body parts, ensuring uniformity and a superior result.

8. painting
The frame, axle housings, driveshaft, and other suspension components are each painted separately using a specialized coating designed for maximum protection. For added durability, a special cavity wax is applied inside the frame to enhance corrosion resistance.
All body parts are painted individually using premium automotive paint. Unlike many competitors who tape off and spray assembled parts, we ensure that components such as the roof, side panels, doors, and smaller body sections are painted separately for a flawless finish.
Additionally, we apply corrosion-preventive wax inside internal cavities—like the bulkhead, doors, side rails, and other areas—to further protect against rust and deterioration.


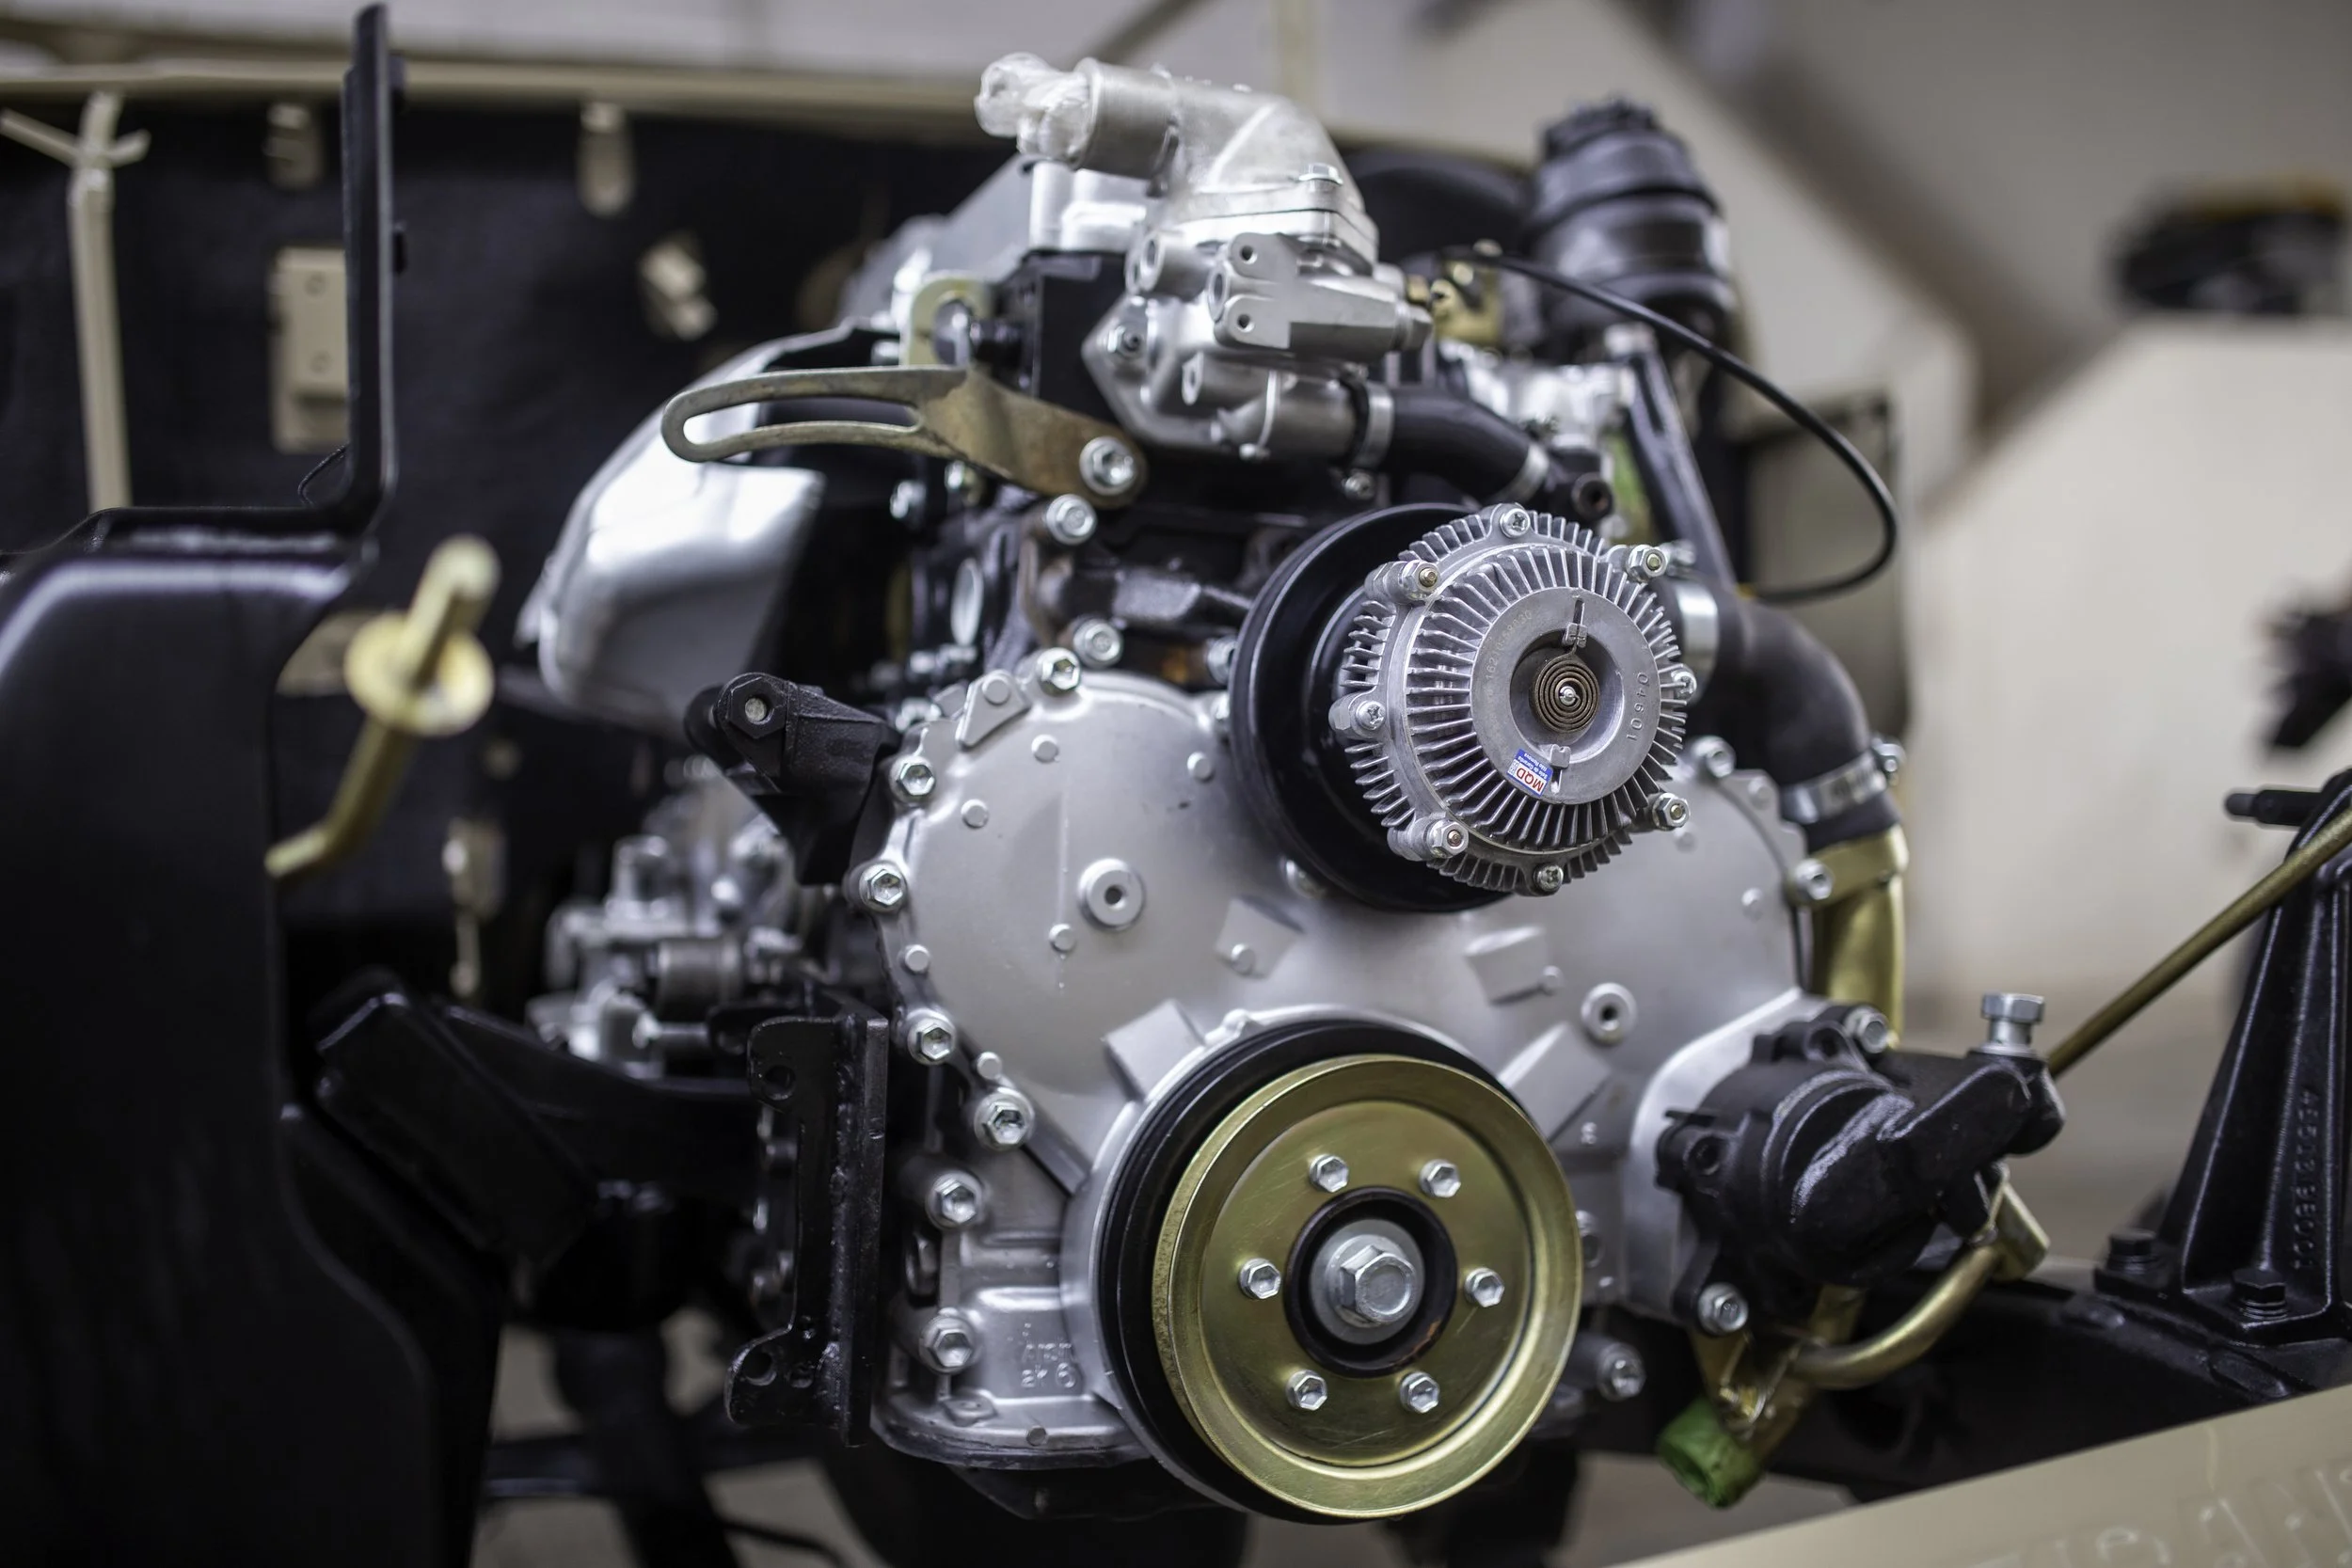
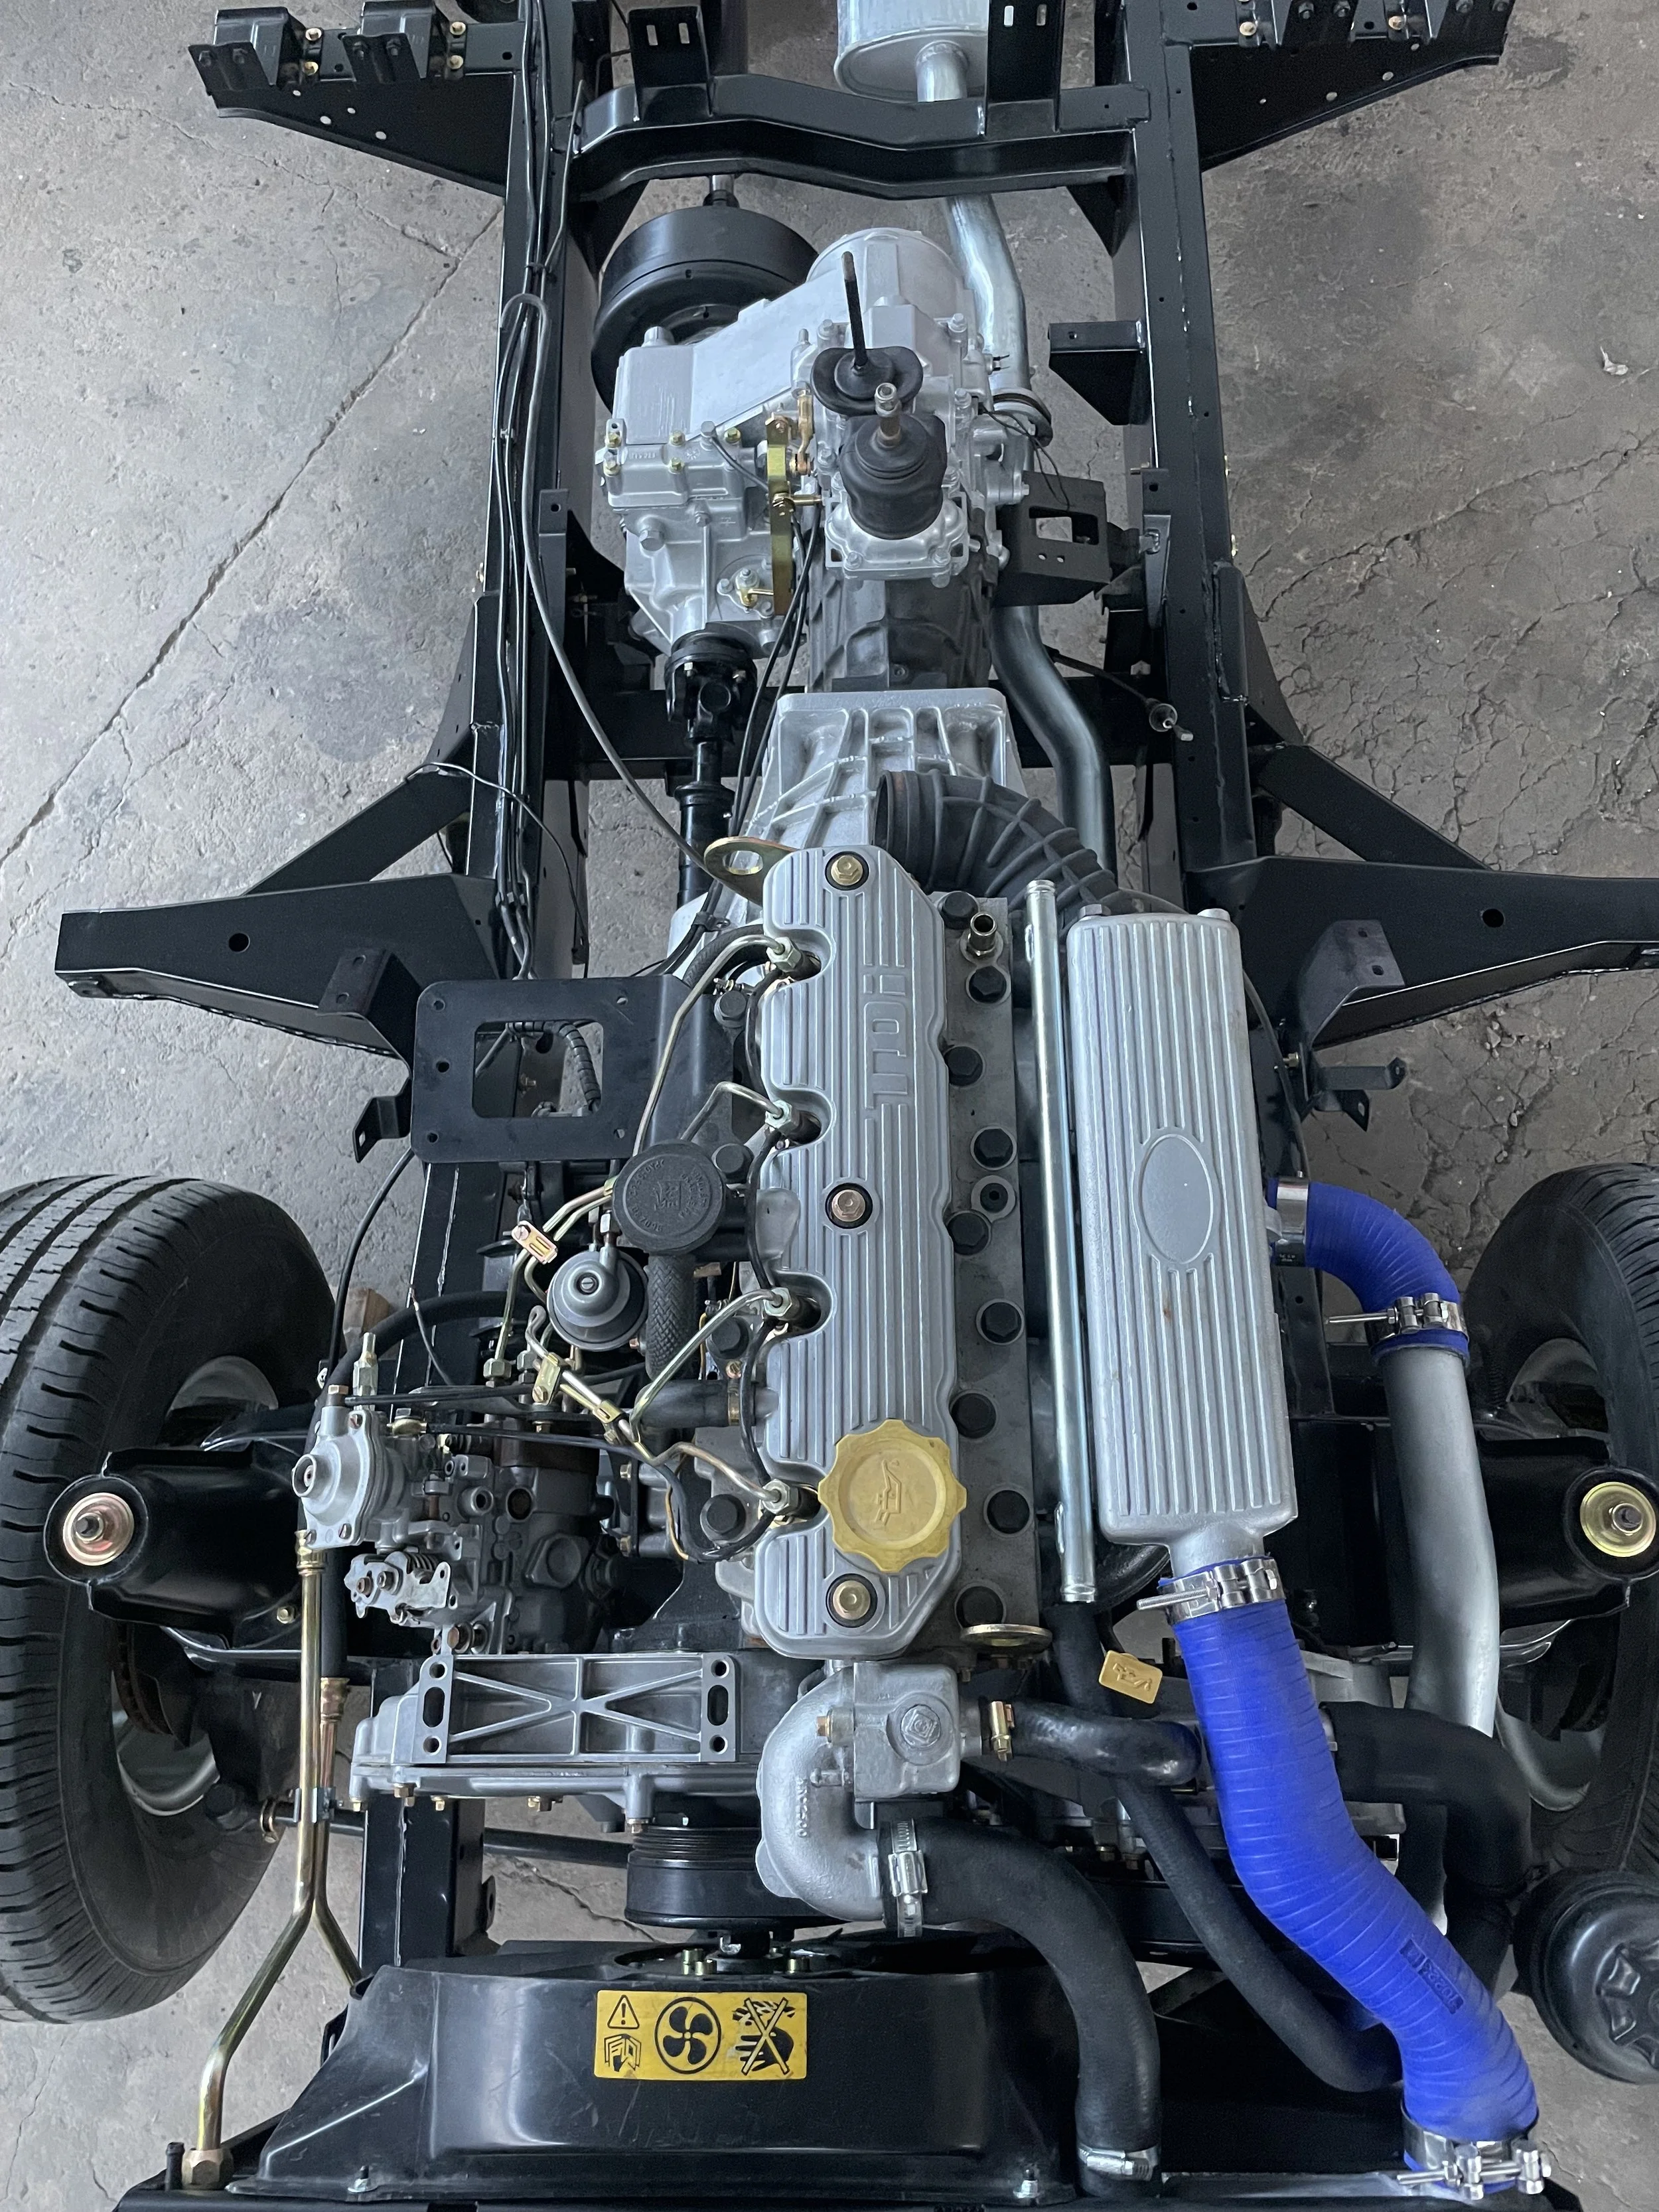
9. mechanical rebuild
During this phase, all mechanical components are completely stripped down for a thorough inspection. The engine, transmission, transfer case, and axles are fully dismantled, allowing us to carefully assess each part. In addition to replacing gaskets and seals, several internal components are replaced as needed to ensure the reliability of a new vehicle, as it would have left the factory.
Furthermore, all suspension bushings, tie rods, springs, shocks, wheel bearings, seals, clutch master and slave cylinders, brake components, and other critical parts are replaced with brand-new, high-quality components. We keep a detailed log of every part replaced, along with receipts, for the customer’s future reference.
Using well-known, reputable brands for these parts is essential to maintaining the highest standards of reliability and performance during this crucial phase of the rebuild.

10. unpholstery and interior
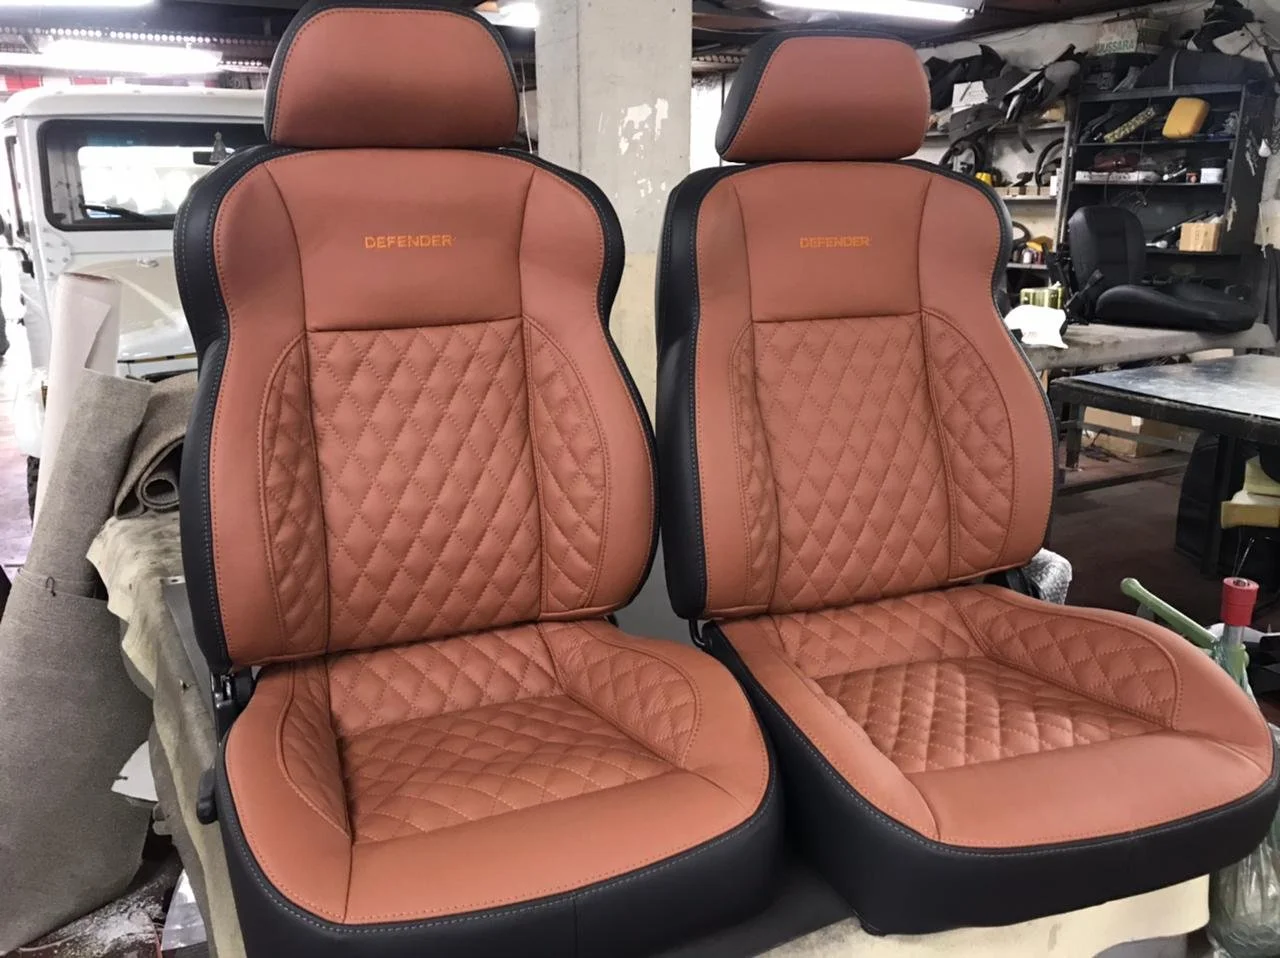
The interior receives special attention, featuring custom stitching and design tailored to each vehicle. Options range from standard upholstery that preserves the original look to high-quality leather upgrades that can extend to the steering wheel, cubby box, dashboard, and door panels. If desired, seat heaters can also be installed, along with aluminum finishes on vents, knobs, and door details for a refined touch.
The headliner is replaced with either original or custom materials to match the interior. Our team offers full customization of interior components, wrapping them in the chosen leather and design. Additionally, the vehicle is fitted with brand-new carpeting that aligns with the overall interior aesthetic.


11. assembly
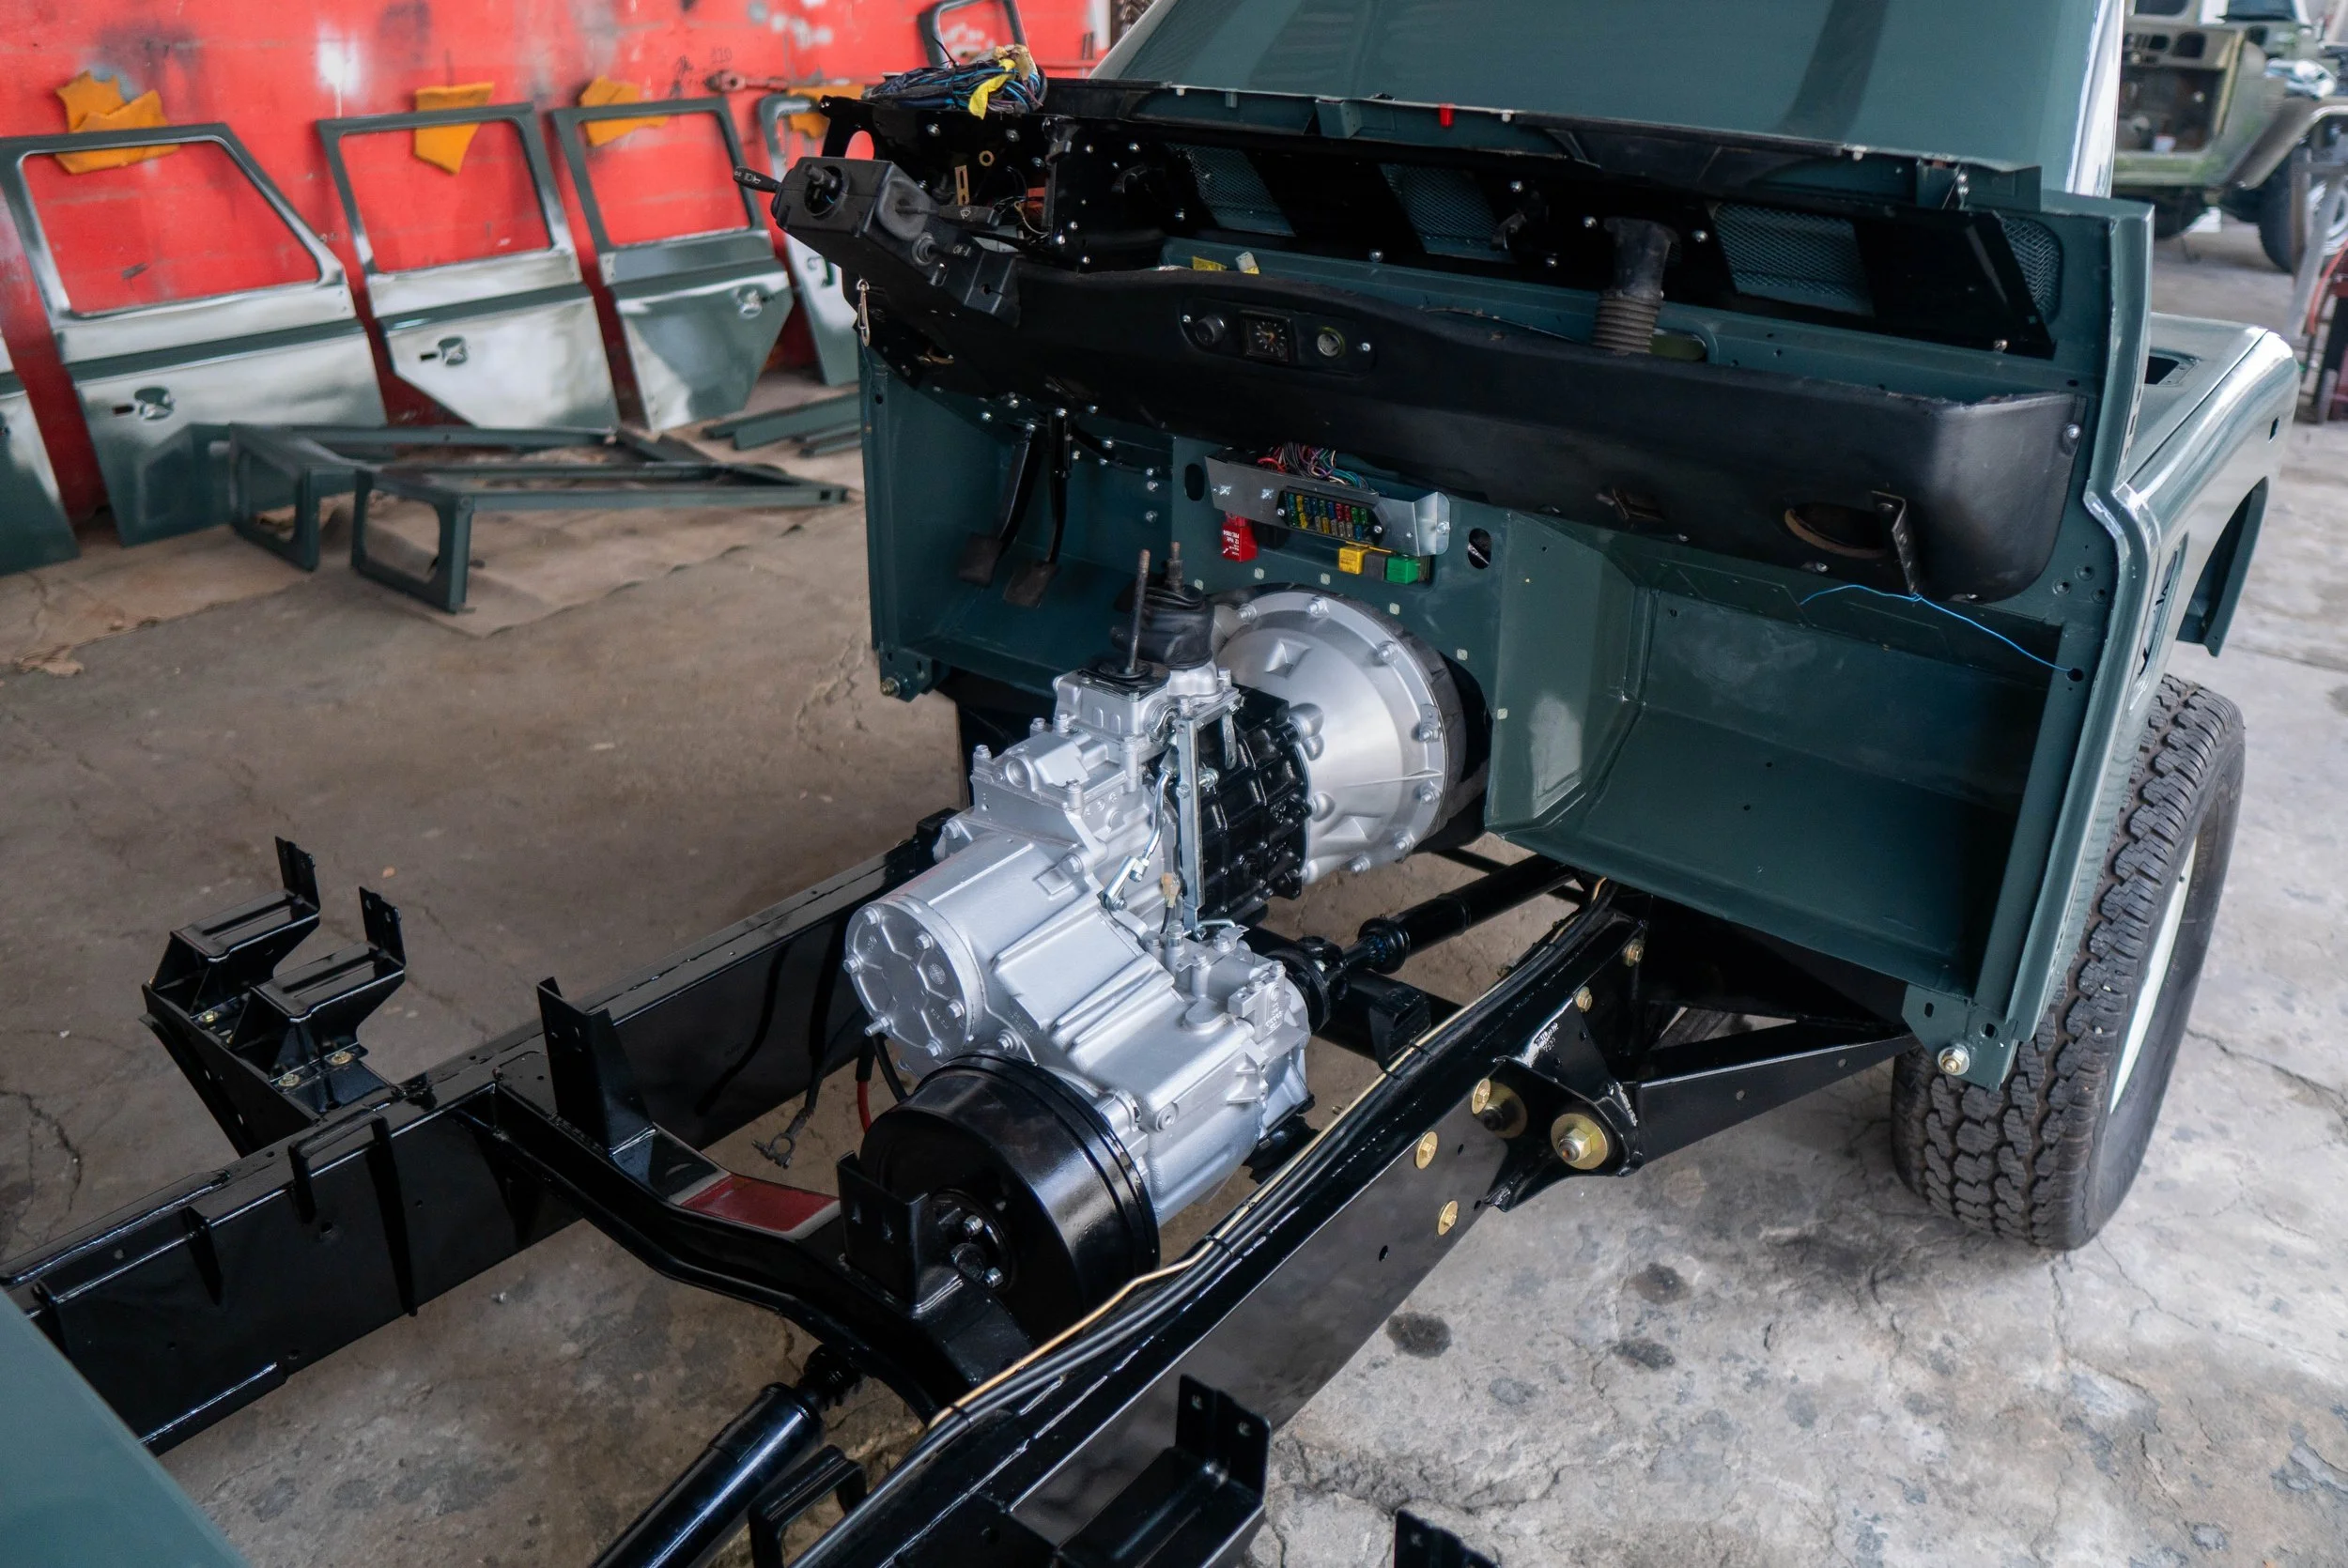
At this point all body panels are meticulously installed for a perfect alignment with new factory rivets and bolts. Brackets are also replaced with new or zinc coated. It is also when the well-known Defender issues with water ingress are resolved and also corrosion protection is improved with a special cavity wax as an example.
Also, hinges, door seals, window seals window channels, door locks, door handles, etc are replaced with new quality parts.

12. electrical
When rebuilding a classic off-road vehicle that is over 25 years old, revising the electrical system is critical to ensuring both safety and functionality. Aging wiring and outdated fuses can be prone to failure, leading to potential hazards. To address this, we replace all original fuses with newer, safer alternatives to meet modern safety standards.
For any new accessories, such as power windows, heated seats, air conditioning, and auxiliary lights, we install a completely independent custom wiring harness. This harness is specifically designed for the added components and ensures that the new systems function flawlessly without interfering with the original electrical setup.
A new fuse box and relays are installed to manage the added accessories, keeping them separate from the vehicle's existing wiring system. Additionally, we provide a detailed electrical diagram of the new accessory installations with the vehicle, ensuring easy future maintenance.
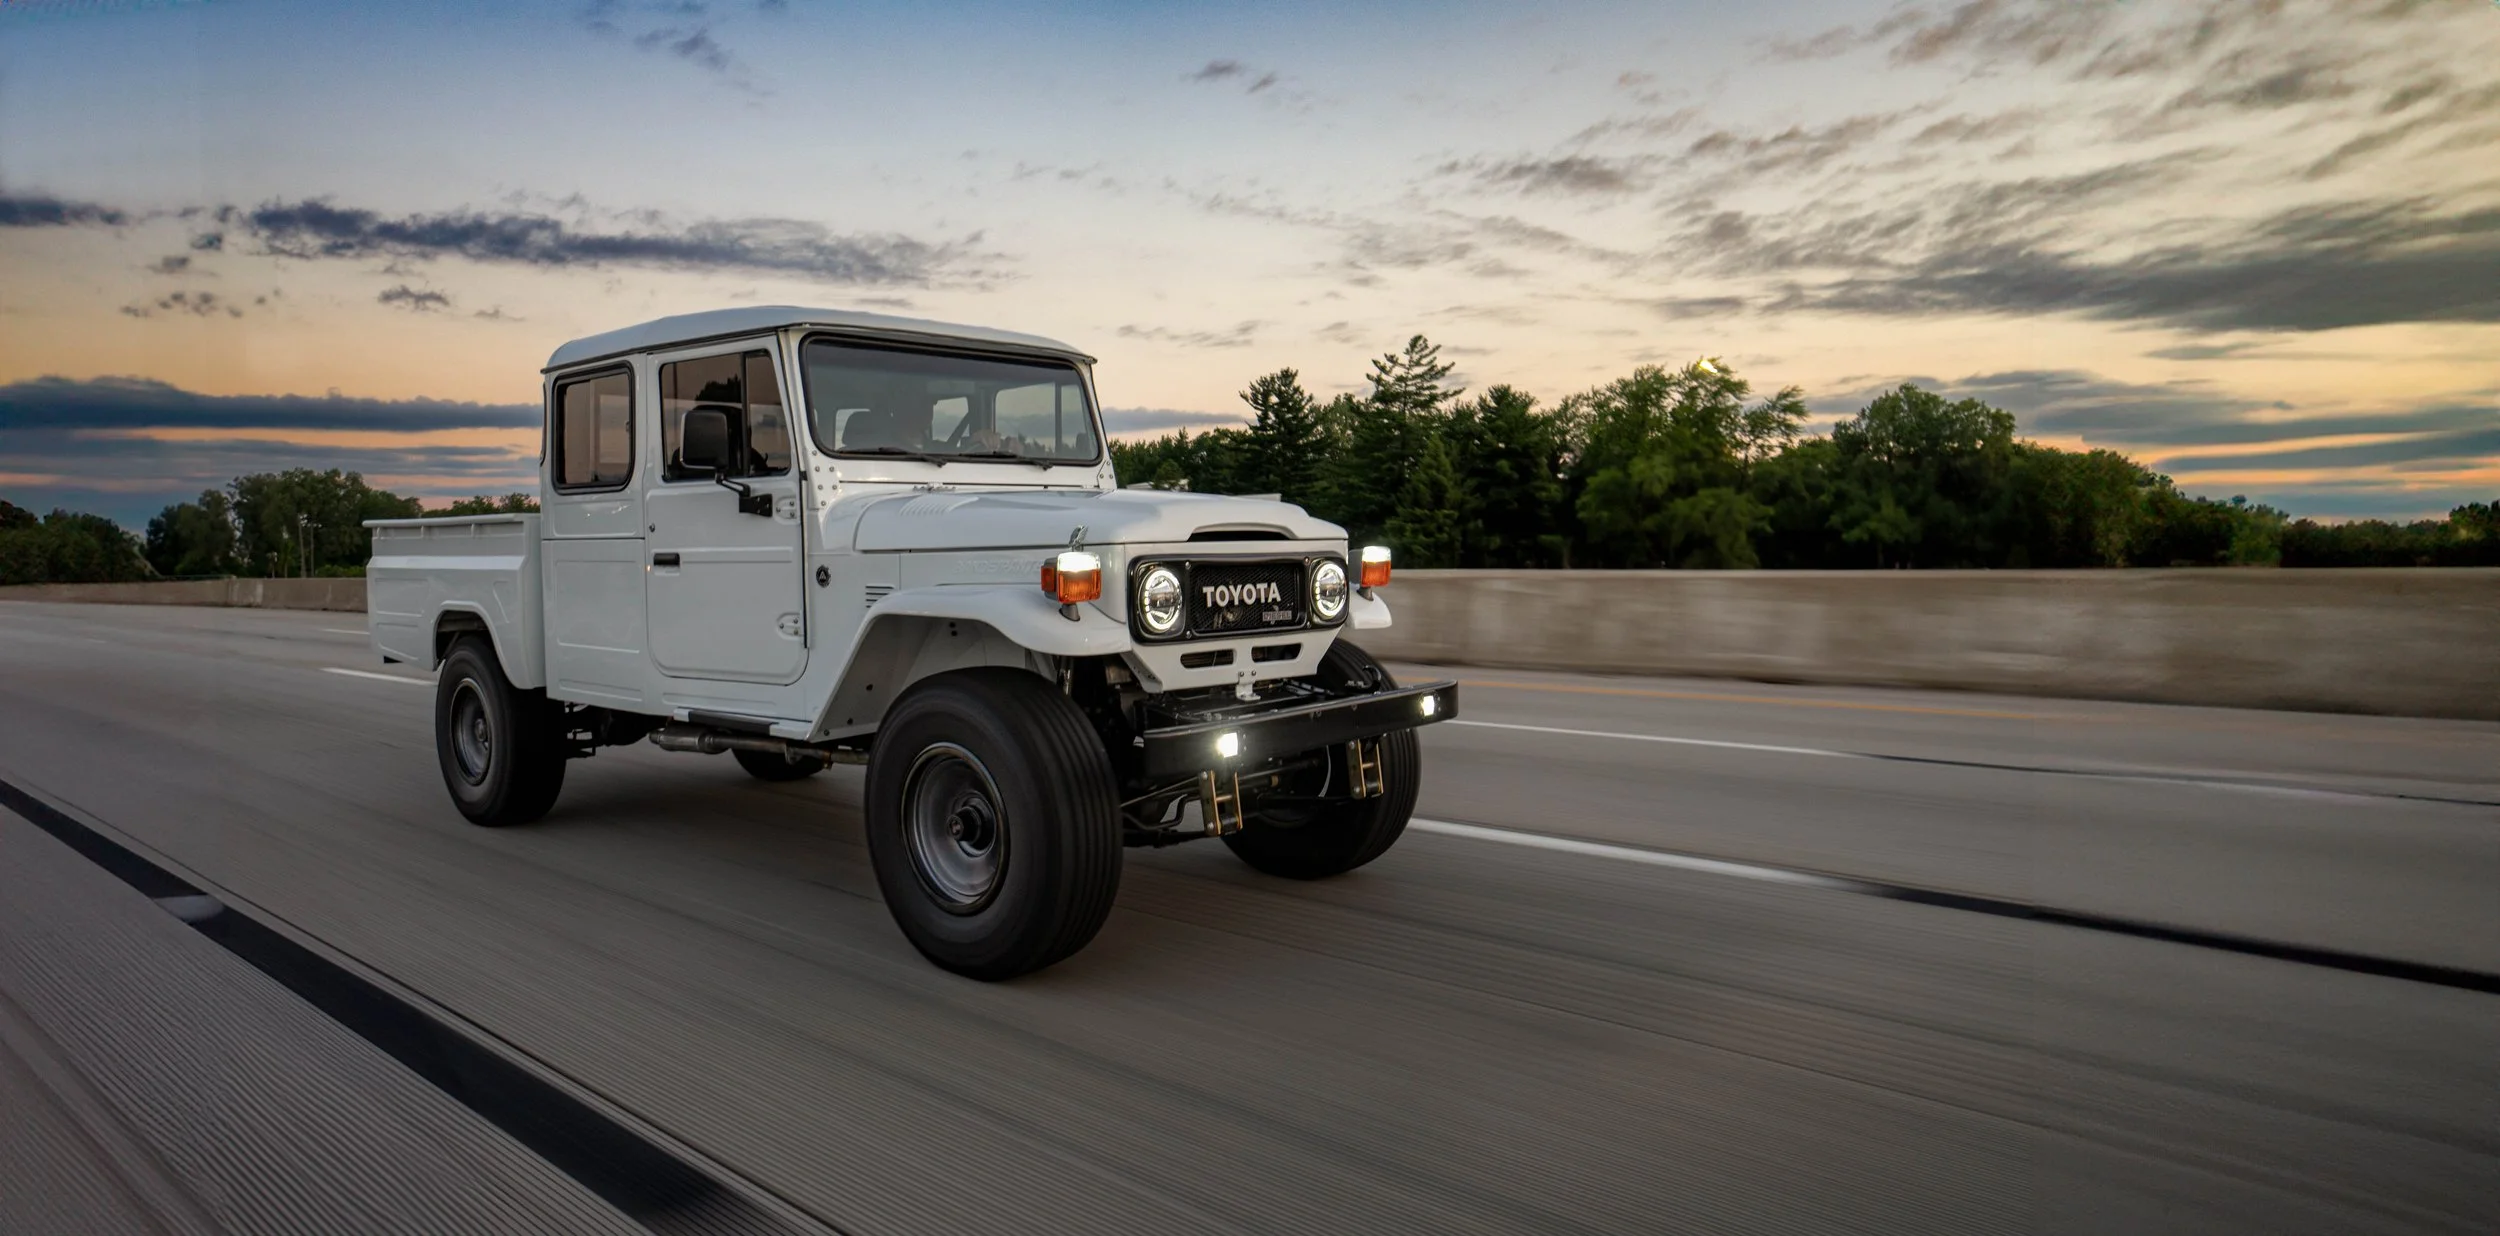
13. road test and quality control
This is one of the most crucial steps in our restoration process. Every vehicle undergoes a thorough series of tests to ensure both quality and reliability. This includes comprehensive road testing, where the vehicle is driven for a minimum of 1,000 miles before being made available for sale.
The extended road test allows us to monitor the performance of the engine, drivetrain, suspension, and other mechanical systems. Any potential issues can be identified and resolved long before the vehicle reaches its new owner.
We also follow a detailed quality control checklist, with multiple inspection points covering every aspect of the vehicle’s functionality. From electrical systems and accessories to body alignment and interior finishes, nothing is overlooked. This step ensures that the vehicle not only looks impeccable but also performs flawlessly.